2 -
1
2
3
4
5
6
7
8
9
10
11
12
13
14
15
16
17
18
19
20
21
22
23
24
25
26
27
28
29
30
31
32
33
34
 Spare parts catalogue
Important
Bold reference numbers in this section identify parts not shown in the figures alongside the text, but which can be found in the exploded view diagram.
Note
*The pieces identified with such symbol are not present in USA version.
Removing the front half-fairing
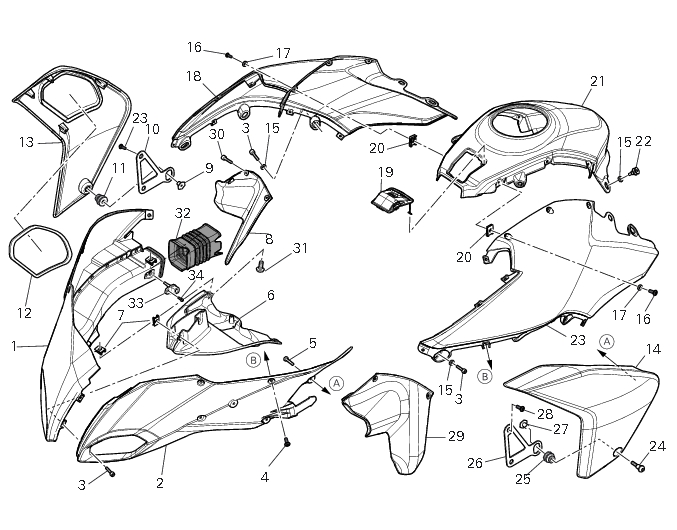
Remove the air deflector (8) by loosening the screws (30) and unhooking tab (A) from the recess on the front half-fairing.
Follow the same procedure to remove the air deflector (29).
Note
In the 1200S ABS model the screws (30) have nylon washers.
Loosen the screws (4) that retain the front half-fairing, and loosen screws (24).
Note
In the 1200S ABS model the screws (4) have nylon washers.
Remove the sleeve (32) (A) from the air-box resonator and the air temperature sensor connector (A).
Remove the lower half-fairing by releasing pin (B) from the rubber pad on the oil cooler (C).
 
 
Front half-fairing disassembly
Undo the screws (31) and remove the lower half-fairing (6) from the front half-fairing unit.
Undo the screws (3) and separate the front right half-fairing (1) from the left one (2).
Slide the hose (32) and undo the screw (34) to remove the pressure sensor (33).
Front half-fairing reassembly
Make sure that the quick couplings (7) are fitted on the front half-fairings.
Check for the O-ring (D) to be fitted on the air pressure sensor (33).
Refit the hose (32) and the air pressure sensor (33) on the front RH half-fairing by starting and tightening the screw (34) to a torque of 5 Nm ± 10% (Sect. 3 - 3, Frame torque settings).
Assemble the LH half-fairing (1) with the lower half-fairing (6) by inserting the reed (E) in the slit (F).
Fix the RH half-fairing (1) to the lower half-fairing (6) by starting and tightening the screw (31) to a torque of 2 Nm ± 10%.
Note
Use the special tab (G) as retainer for the air duct.
Repeat this operation to refit the LH half-fairing (2).
Couple the half-fairings by fitting the screws (3).
Tighten the screws (3) to a torque of 2 Nm ± 10% (Sect. 3 - 3, Frame torque settings).
Refitting the front half-fairing
Make sure that the clips (H) are fitted to the headlight fairing.
Refit the front half-fairing by inserting the sleeve (32) into the air-box resonator.
Note
To facilitate the insertion of the sleeve (32) on the union use, if necessary, a rubber suitable lubricant.
Connect the air temperature sensor connector (A).
Center the front half-fairing by entering the pin (B), located in the internal side, in the vibration damping pad of the oil cooler.
Note
To better insert the pin (B) in the vibration damping pad use rubber suitable lubricant.
Insert and tighten to torque of 2 Nm ±10% (Sect. 3 - 3, Frame torque settings) the front half-fairing retaining screws (4).
Note
In the 1200S ABS model the screws (4) have nylon washers.
Refit the air deflector (8) by fitting the tab (A) in the recess on the front half-fairing.
Apply the recommended threadlocker to the screws (30).
Note
In the 1200S ABS model the screws (30) have nylon washers.
 
Start and tighten the screws (30) to a torque of 2 Nm ± 10% (Sect. 3 - 3, Frame torque settings).
Check that the screws (28) are tightened to a torque of 6 Nm ± 10% (Sect. 3 - 3, Frame torque settings).
Insert the vibration damping pad (25) in the bracket fixed to the cooler.
Insert bush (27) in the vibration damping pad (25).
Follow the same procedure to remove the air deflector (29).
Start and tighten the screws (24) to a torque of 5 Nm ± 10% (Sect. 3 - 3, Frame torque settings).
 
 
Removal of the fuel tank fairings
Undo the screws (A) retaining the headlight fairing with the fuel tank fairings.
Undo the screws (16), and (22) and remove the LH (23) and RH (18) lateral tank fairings, by keeping washers (15), and (17).
Undo the screws (22) and remove the central tank fairing (21), retrieving the washers (15).
Refitting the fuel tank fairings
Make sure that the clips (20) are fitted on the central tank fairing (21).
 
Insert the hands free cover (19) safety tab in the hole in on the central tank fairing (21).
Note
In the USA version the hands free cover (19) is not present.
Fit on the central tank fairing (21) the hands free cover (19) by pushing in the arrows direction.
Refit the central tank fairing (21) by starting and tightening the front screws (22), complete with washers, to a torque of
4 Nm±10% (Sect. 3 - 3, Frame torque settings).
Warning
The rear screw (22) shall be started and screwed fully home but not tightened.
Make sure that clips (20) are fitted on the tank fairings (18) and (23).
Refit the LH (23) and RH (18) tank fairings by starting the screws (16) with washers (17) and screws (22) with washers (15).
Tighten the screws (16) to a torque of 2 Nm ± 10% (Sect. 3 - 3, Frame torque settings).
Tighten the screws (22) to a torque of 4 Nm ± 10% (Sect. 3 - 3, Frame torque settings).
Insert and tighten to torque of 2 Nm ±10% (Sect. 3 - 3, Frame torque settings) the screws (A) that retaining the headlight fairing with the tank fairings.


1